SQLITE NOT INSTALLED
Removing eye makeup sounds simple, but done carelessly it can leave your eyes irritated, your lashes brittle, and your delicate eyelids inflamed. This article walks through everything you need to know to take off eye makeup gently, effectively, and safely. Expect practical steps, product comparisons, troubleshooting tips, sensible ingredient guidance, and routines for a range of situations—from quick wipes after a long day to taking off heavy waterproof stage makeup. Read on and you’ll have a reliable, gentle ritual that preserves both the health and appearance of your eyes.
Why careful eye makeup removal matters
The skin around the eyes is thinner and more delicate than skin elsewhere on the face. It has fewer oil glands and a different structure, which makes it prone to dryness, creasing, and sensitivity. Makeup particles, mascara flakes, and residue from eyeliners or glitters can irritate the conjunctiva and lashes if left in place overnight.
Beyond immediate comfort, proper removal protects the lashes and eyelid margin (the area where lashes grow). Poor technique or harsh removers can cause lash breakage or even accelerate lash loss over time. If you wear contact lenses, any leftover makeup or remover residue can become a source of discomfort and infection. Taking a few extra minutes to remove eye makeup correctly pays off in comfort, looks, and eye health.
Common consequences of careless removal
When eye makeup is scraped or rubbed off aggressively, the effects can add up:
-
Lash breakage and thinner-looking lashes.
-
Irritation of the eyelid margin and conjunctiva, causing redness and stinging.
-
Clogged follicles or blepharitis (inflammation of the eyelid edge) from product buildup.
-
Dermatitis triggered by harsh or allergenic ingredients.
-
Transfer of contaminants to contact lenses, increasing risk of infection.
Know the terrain: eyelid anatomy and sensitivities
Understanding a little about eyelid anatomy clarifies why gentle techniques matter. The eyelid surface is thin and mobile, with a continuous blink that spreads tear film over the eye. The lash line and eyelid margin host glands that produce oils essential for tear stability. Disrupting those glands with abrasive rubbing or stripping them with strong cleansers can cause dry eyes, blurred vision, and discomfort.
The eyelashes themselves are hair structures susceptible to mechanical damage. Pulling on mascara-clumped lashes or scrubbing at the base of the lashes can yank hairs out. That’s why dissolving makeup with appropriate products before wiping is the core principle of effective removal.
Allergies and sensitivities to remember
Scented products, certain preservatives, and strong surfactants often provoke reactions around the eyes. If you notice burning, itching, swelling, or a persistent red rim after using a product, stop immediately. Patch testing a new remover on the inner forearm or behind the ear for 48 hours can catch many sensitivities before you apply it near your eyes.
Tools and product types: what to choose
There’s no single “best” remover; the right product depends on the makeup you wear, your skin type, and whether you have treatments like lash extensions. Below is a practical comparison of common remover types to help you decide.
| Remover Type | How it works | Best for | Drawbacks |
|---|---|---|---|
| Oil-based cleansers / cleansing oils | Dissolve makeup by mixing with oils; lift pigments and mascaras | Waterproof makeup, heavy mascara, long-wear products | Can cause problems with lash extensions; needs rinsing or double-cleanse |
| Cleansing balms | Solid oil that melts on contact; emulsifies with water | Dense makeup, those who prefer a luxuriously gentle feel | Must be washed off thoroughly to avoid residue |
| Micellar water | Micelles capture dirt and oil in suspended clusters | Light makeup, sensitive eyes, quick cleansing | May struggle with very waterproof products; some contain fragrance |
| Cleansing milk or lotion | Gentle emulsifying creams that remove makeup | Dry or mature skin; gentle everyday use | Less effective on heavy or waterproof formulas |
| Makeup-removing wipes | Pre-soaked single-use cloths | Travel, quick removal | Can be abrasive, may leave residue, not eco-friendly |
| Oil-free eye makeup removers | Designed to remove eye makeup without oils | Contact lens wearers, lash extensions, those avoiding oil | May be less effective on stubborn waterproof formulas |
Reusable tools and pads
Whether you use cotton pads, reusable muslin or bamboo pads, or soft washcloths matters. Cotton balls may leave lint; some pads are too coarse for eyelids. Muslin or microfiber cloths are soft and offer gentle friction that can help lift makeup when used correctly. Keep reusable pads clean—wash after a few uses to prevent microbial growth.
Special cases: lash extensions and waterproof makeup
Lash extensions require oil-free removers because oils can break down the adhesive bond. For waterproof mascara, oil-based removers or high-quality, oil-free dissolving formulas are necessary—more on technique in the next section.
Step-by-step: a reliable daily routine
If you want a simple, effective nightly ritual, follow these steps. They keep the eyes calm and ensure makeup is actually removed rather than smeared.
-
Remove contact lenses before you begin. This prevents anything from getting trapped between the lens and the eye and reduces irritation during the removal process.
-
Select a remover suitable for the makeup you wore. For waterproof mascara or heavy liner, opt for oil-based or two-phase removers. For light makeup and sensitive eyes, a gentle micellar water works well.
-
Saturate a pad (cotton or reusable) generously with the remover. Don’t over-saturate to the point of dripping, but make sure there’s enough product to dissolve pigments.
-
Close your eyes and place the pad over the lid and lashes, resting it for 10–20 seconds. Let the remover dissolve the makeup — pressing gently acts like a tiny solvent bath.
-
Wipe gently downward and outward. Use light strokes; avoid harsh back-and-forth scrubbing. For mascara, a downward sweep along the lashes lifts the softened product off without pulling hairs.
-
If there’s still residue along the lash line or in the inner corner, dampen a clean cotton bud with remover and sweep along the base of lashes and lash line.
-
Rinse the area with lukewarm water if your remover requires it, or follow with your regular cleanser in a double-cleanse if you used oil. This removes any oily film and leftover product.
-
Pat dry with a clean, soft towel and apply a light eye cream or hydrating serum if you like. Keep pressure low—pat, don’t rub.
Why holding the pad matters
That quiet, ten-second hold is the most underrated move in eye care. Makeup pigments and waterproof formulations are designed to resist water and sweat. They succumb to solvents over time, not force. Holding a soaked pad lets the remover break down pigments so they lift cleanly—no scraping required.
Removing different types of eye makeup

Different products call for specific approaches. Below are practical techniques for the most common and stubborn formats.
Waterproof mascara
Waterproof formulas cling tenaciously to lashes. The best plan: dissolve, don’t tug. Use an oil-based remover or a two-phase formula (shake to mix oil and water phases). Soak the pad and hold it against closed eyes for 15–20 seconds. Then sweep gently downward, repeating as needed. Replace the pad once it becomes saturated with dissolved mascara so you’re not re-depositing pigment back onto the lashes.
For flaking or crumbling mascara, make small, deliberate downward sweeps rather than one big motion. If lashes tangle, separate them afterward with a clean spoolie instead of pulling.
Liquid eyeliner (regular and waterproof)
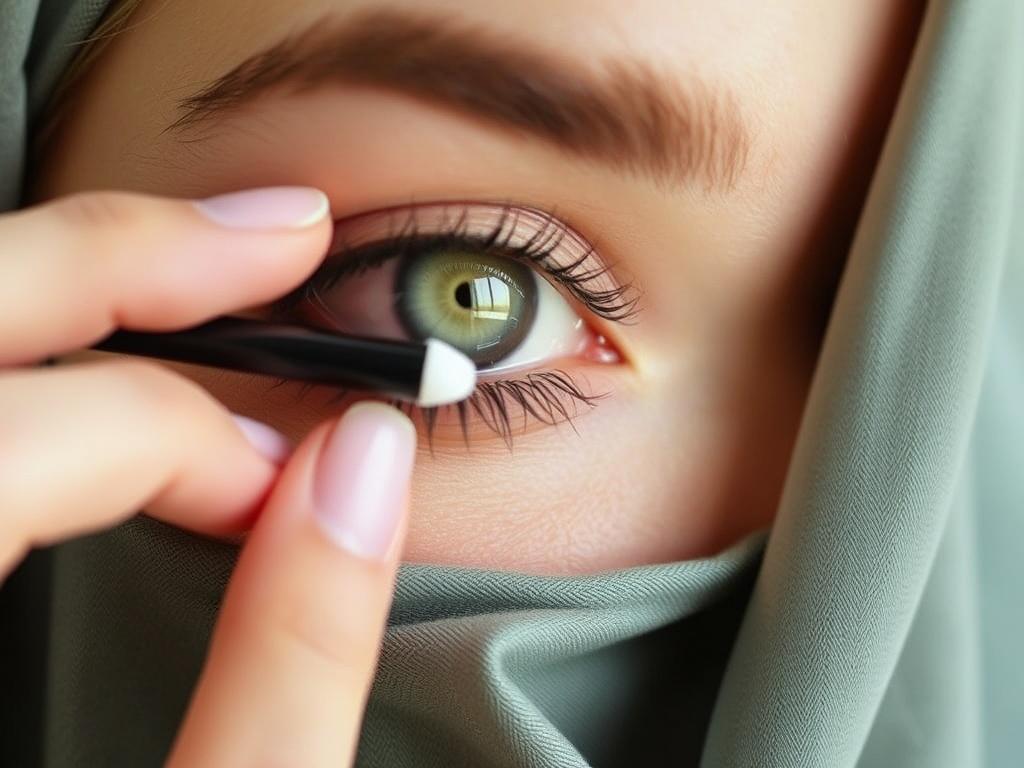
For liquid liner on the lash line, wet a cotton bud with remover and sweep along the lash base. For thick eyeliner layers, begin with a pad hold to melt the product, then use the bud to lift remnants. Avoid scraping across the globe of the eye; target the base where product adheres.
Gel and pencil eyeliner
Gel liners can be stubborn because they sit in the lash line crease. A cotton bud is your ally here. Soften with remover, then glide the bud along the base of the lashes. For pencil eyeliners, a pad hold followed by a gentle wipe usually does the trick, and further cleaning with a bud detangles residue.
Eyeshadow (powder, cream, and glitter)
Powder shadows usually come off with micellar water or a gentle cleanser. Cream shadows require an oil-based approach to dissolve the product. Glitter deserves its own strategy: start with a pad to lift as much as possible, then use a soft brush or sticky-tape method (pressing a piece of hypoallergenic tape to the glitter and lifting it away) if stray glitter remains. Be very careful with tape to avoid pulling lashes or skin. Always finish by rinsing thoroughly, because glitter particles can irritate the eyeball.
False eyelashes and strip lashes
To remove strip lashes, hold a pad soaked with remover against the lash band for 10–15 seconds to loosen the adhesive. Gently peel from the outer corner toward the inner corner. If adhesive resists, apply more remover and wait; never yank. Clean the band of residual glue before reusing, and store lashes in a clean case.
Eyelash extensions
Do not use oil-based removers with lash extensions unless specifically allowed by your technician. Oil can dissolve the adhesive. Instead, use an oil-free, gentle remover recommended by extension specialists. Visit a trained technician to remove extensions rather than attempting to pull them out at home—improper removal risks damaging your natural lashes.
Techniques that protect lashes and skin
Technique counts as much as product choice. Gentle handling, the correct order of steps, and using clean tools all make a difference.
Order of operations
Remove eye makeup before cleansing the rest of your face. Doing so prevents smearing and forces you to slow down for the delicate areas. After removing makeup, complete a regular face cleanse to remove any leftover oils or traces of makeup — this is especially important if you used an oil-based remover.
Use directionality to your advantage
When removing mascara, move in the direction the lashes naturally grow—downward and outward. For lid makeup, lift gently from the inner corner toward the temple when working on the upper lid. These small directional choices minimize stress on the skin and lashes.
How to use cotton buds safely
Use a cotton bud moistened with remover to work along the lash line. Roll the bud gently and sweep along the base to get stubborn liner residue. Replace buds often; a saturated bud simply redeposits pigment. Avoid poking or pressing into the eye itself.
Don’t over-cleanse
Stripping the eyelid of its natural oils can lead to dryness and rebound oiliness, which may make products runnier the next time you apply them. Clean until makeup is gone; don’t chase an unnaturally squeaky-clean feeling.
Ingredients: what to choose and what to avoid
Some ingredients are intentionally gentle; others can provoke reactions around the eyes. Know what to look for.
Helpful, generally gentle ingredients
-
Glycerin: a humectant that helps retain moisture.
-
Natural oils like sunflower, safflower, jojoba, or fractionated coconut oil: effective solvents for many makeup products (avoid with extensions).
-
Poloxamers and gentle surfactants: found in micellar waters; effective without harsh stripping.
-
Panthenol and mild botanical extracts like chamomile or oat: soothing in many formulations.
Ingredients to be cautious with near the eyes
-
Fragrance: can cause irritation and allergic contact dermatitis.
-
Denatured alcohol (often labeled “alcohol denat.”): can dry and sting sensitive eyelids.
-
Strong preservatives or known contact allergens: check if you have a history of reactions to preservatives like certain formaldehyde releasers or methylisothiazolinone.
-
Abrasive particles: avoid rough exfoliants near the eye area.
Read labels, and if you have reactive skin, choose products marketed as hypoallergenic and ophthalmologist-tested. Still, “hypoallergenic” is not regulated—patch testing remains wise.
Aftercare: what to do once the makeup is gone

Removing makeup is only half the job. Follow up with simple aftercare to maintain hydration, support lash health, and reduce inflammation risk.
Rinse and cleanse
If you used an oil-based cleanser, follow with a gentle water-based face wash to remove any residue—this is the “double cleanse” method popular for ensuring no film remains. Use lukewarm water; hot water can strip moisture away.
Hydrate and protect
Pat the area dry and apply a small amount of eye cream or serum targeted to your needs. Ingredients like hyaluronic acid for hydrating or peptides for strengthening can be beneficial. Apply gently using your ring finger to avoid excess pressure.
Lash care
If lashes feel stiff from product or removers, comb them with a clean spoolie to realign and remove clumped bits. Avoid regular use of waterproof mascara, which can require harsher removers and weaken hair over time.
Common mistakes and how to fix them
Here are frequent missteps people make—with fixes that are easy to adopt.
Rubbing vigorously
Why it’s a problem: Abrasive motion damages lash roots and thins delicate skin.
Fix: Soak and hold. Let the remover do the work, then sweep gently. Use soft pads or muslin cloths.
Using oil with lash extensions
Why it’s a problem: Oil breaks down extension adhesive.
Fix: Use oil-free, extension-safe removers recommended by your lash technician. Visit a professional to remove extensions instead of pulling them off.
Relying on wipes every night
Why it’s a problem: Many wipes irritate and leave residue; some are abrasive.
Fix: Reserve wipes for travel. Use proper removers and a gentle cleanser for nightly care. If you must use wipes, choose ones formulated for sensitive eyes and follow with a rinse.
Scrubbing glitter
Why it’s a problem: Glitter particles can scratch the cornea and cause microabrasions.
Fix: Use oil or tape to lift glitter gently. For stubborn particles on the eyeball, consult an eye care professional rather than digging around with cotton swabs.
Special situations and tailored routines
Different lifestyles demand different approaches. Below are tailored routines for common circumstances.
For contact lens wearers
-
Remove lenses before taking off makeup. This avoids trapping residue under the lens and reduces irritation.
-
Choose oil-free or ophthalmologist-tested removers if you are prone to eye sensitivity.
-
Rinse eyes with sterile saline if you feel any discomfort after removal before reinserting lenses.
For sensitive or reactive skin
-
Patch test new products. Apply a small amount on the inner arm and monitor for 48 hours.
-
Stick to minimal-ingredient formulas designed for sensitive skin and avoid fragrance.
-
Use moisturizers with calming actives like panthenol or oat extract post-removal.
For heavy glam or theatrical makeup
Layered or long-wear theatrical looks need a two-step approach: first break down surface pigments with an oil-based remover or a dedicated stage makeup remover; then double-cleanse with a gentle foam or cream to clear residue. Consider a pre-removal step with a makeup-removing balm if the makeup is dense.
For short sleep or travel
When time is tight: use micellar water or an oil-free two-phase remover and a soft pad to dissolve makeup quickly. If you’re too tired for a full cleanse, remove eye makeup at a minimum—eyes are the most sensitive area and benefit most from being cleaned before sleep.
DIY removers and safety notes
Many people consider making a homemade remover. Simpler is safer. A single clean oil—like sunflower, jojoba, or fractionated coconut oil—can remove most eye makeup effectively. Apply a small amount to a cotton pad, hold, and wipe. Keep the oil container clean and use within a reasonable timeframe.
Be cautious with more complex DIY recipes that combine water and oil without preservatives. Such mixtures can become contaminated and cause eye infections unless properly formulated and preserved. For most users, store-bought, ophthalmologist-tested products are the safer choice.
Simple oil remover recipe (low-risk)
-
Use a clean glass bottle and pour a small amount of 100% jojoba or sunflower oil.
-
Apply a few drops to a clean pad when needed. Do not add water. Close bottle tightly and store away from direct heat.
-
Discard if the oil smells off or has been left open for a long period.
This oil-only approach is less likely to introduce bacteria than homemade emulsions. Still, avoid it if you have lash extensions or are prone to milia (tiny white bumps), and always patch-test if you’ve never used the oil before.
Sustainability and eco-conscious choices
Makeup removal generates waste—single-use wipes, cotton balls, and disposable pads add up. Consider reusable options: washable muslin pads, bamboo pads, or a soft microfiber cloth. These can be washed in hot water with detergent and reused hundreds of times, reducing landfill contribution. When buying disposables, favor biodegradable wipes made from plant fibers and avoid those with plastic fibers.
Additionally, choose concentrated removers or biodegradable packaging when possible. A little planning reduces both environmental impact and long-term cost.
Troubleshooting: handling irritation, stinging, and residue

If your eyes sting after removal, identify the likely cause quickly. Rinse with sterile saline or clean water; avoid rubbing. If stinging persists, seek advice from an eye care professional. For redness or swelling, discontinue products and consult a clinician if symptoms are significant or persist.
If makeup residue remains despite a thorough attempt, evaluate whether you’re using the right product for the job. Waterproof or long-wear formulas often need oil-based solutions. If residue still clings, try a professional-grade remover or revisit the technique—longer pad holds, smaller sections, or cotton buds for the lash line.
When to see a specialist
-
Severe or prolonged redness, discharge, or pain.
-
Signs of infection (increasing pain, swelling, abnormal discharge).
-
Persistent dermatitis unresponsive to avoidance of suspected products.
-
Problems related to lash extensions, lash loss, or adhesive reactions.
Quick reference: do’s and don’ts
| Do | Don’t |
|---|---|
| Do choose removers suited to the product type (oil for waterproof, micellar for light makeup). | Don’t scrub aggressively or tug at lashes. |
| Do hold a soaked pad for several seconds to dissolve makeup. | Don’t rely exclusively on wipes for nightly removal. |
| Do rinse and double-cleanse after oil-based removal. | Don’t use oil removers on lash extensions unless advised by a technician. |
| Do patch test new products if you’re prone to sensitivity. | Don’t improvise complex DIY emulsions without preservatives. |
| Do keep reusable pads clean to avoid bacterial contamination. | Don’t sleep in heavy eye makeup regularly—give lashes a break. |
Checklist for the perfect removal session
-
Remove contact lenses first.
-
Choose an appropriate remover: oil for waterproof, micellar for light, oil-free for extensions.
-
Saturate a soft pad; hold it over closed eyes for 10–20 seconds.
-
Sweep gently in the direction of lash growth; use cotton buds for stubborn liner.
-
Rinse or double-cleanse if you used an oil product.
-
Pat dry and apply a small amount of eye hydrating serum or cream.
-
Comb lashes with a clean spoolie if needed and store reusable pads cleanly.
Closing thoughts: small changes, lasting results
Perfectly removing eye makeup isn’t about a single miracle product. It’s a combination of appropriate choices—product, pad, and motion—plus a calm technique. Hold, dissolve, and lift rather than scrub. Be mindful if you have lash extensions or contact lenses, and favor oil-free alternatives where necessary. Maintain clean tools and don’t skimp on aftercare; a little extra attention preserves lash strength and keeps the delicate eyelid skin comfortable and resilient.
Invest a few minutes nightly in this ritual and you’ll notice less irritation, fewer flaky lashes, and makeup that applies more smoothly the next time. The eyes are a small, sensitive part of the face—and they respond well to gentle, sensible care.
Further reading and resources
If you want to dive deeper, look for resources from ophthalmologists and dermatologists on eyelid hygiene and contact lens safety. Professional lash technicians provide extension-specific removal advice, and product ingredient databases can help you identify potential allergens. Rely on clinical sources where possible, and consult a clinician if you have ongoing issues.
Now you have a complete, practical guide to removing eye makeup with care and confidence. Keep it simple: dissolve, don’t drag; choose gentle formulas; and protect your eyes with small, deliberate movements. Your lashes and lids will thank you.